Printing in NUS SoC (Ubuntu edition)
The official docs (require login) from NUS SoC only provides instructions on setting up the network printer on Windows or Mac. The steps to set up the printer in Ubuntu isn’t that complicated, but is not too obvious either, so here’s the guide on how to set up the printer in Ubuntu 16.04 (the interface is slightly different for Ubuntu 18, but the general steps are the same).
Installing Network Printer
- First, take note of the name (e.g. psxxxx) and brand/model (e.g. Lexmark MS810DN) of the printer. The name can be typically found on a green tag affixed on the printer.
- Open the Printers menu. You can do this by pressing the Super key, then typing “printers”. Click the “Add” button on the top left of the window.
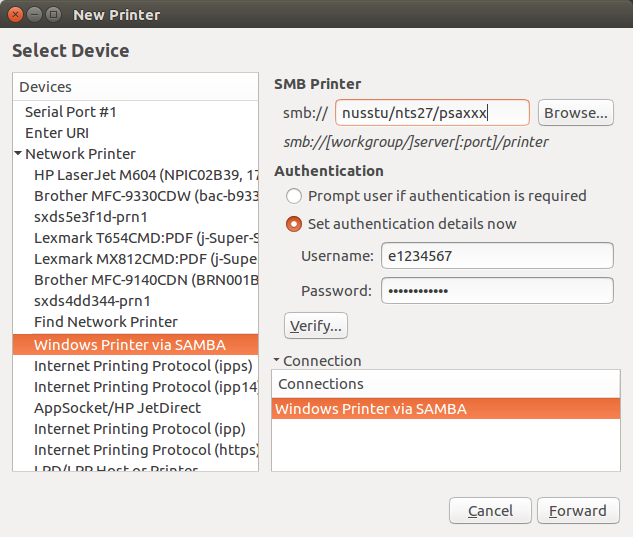
- On the left, expand “Network Printer”, and select “Windows Printer via SAMBA”.
- Type in the address of the printer under the text box “smb://” in the form:
[domain]/[server]/[printer]. For students, this should be:nusstu/nts27/psaxxx(replacepsaxxxby the printer name accordingly). If you’re a staff, the domain should benusstfand the server might bents09. -
Under Authentication, select “Set authentication details now”. Enter your NUSNET username and password (without the domain). There’s no need to press the “verify” button since it’ll fail (but don’t worry it’ll still work).
- Press the “Forward” button. If this is the first time you are installing a SAMBA printer, you might have to install certain packages, just do so. On the following two screens, select the brand of the printer (probably Lexmark), and the model accordingly. Accept the default options for the rest of the screens.
- You’re done. You can print a test page to ensure if the settings are correct.
FAQ
I see many printers automatically added.
You might see other network printers you do not recognize in your Printers window. This is due to Ubuntu automatically detecting and adding network printers in other labs. When you try to remove them, they’ll just reappear almost instantly.
These actually do not cause any issues, but if you find them annoying like me, you can disable automatic network printer installation using the following two commands:
sudo systemctl stop cups-browsed
sudo systemctl disable cups-browsed
Then remove the unwanted printers and they should no longer reappear.
How to I see the print queue on the printer?
SSH into sunfire (sunfire.comp.nus.edu.sg), then use the following command:
lpq -P psxXXX -l # replace psxXXX by the printer name
“Authentication Required” when adding printer.
In the last screen when adding the printer, you may be prompted for a password. Typing your own Ubuntu username/password does not work. In this case, you might be affected by this bug. I’m not sure how to fix this, but you can workaround by launching the printer config with sudo:
sudo system-config-printer
Then add the printer as per the above instructions.
(Updated 15 May 2019 with FAQ)